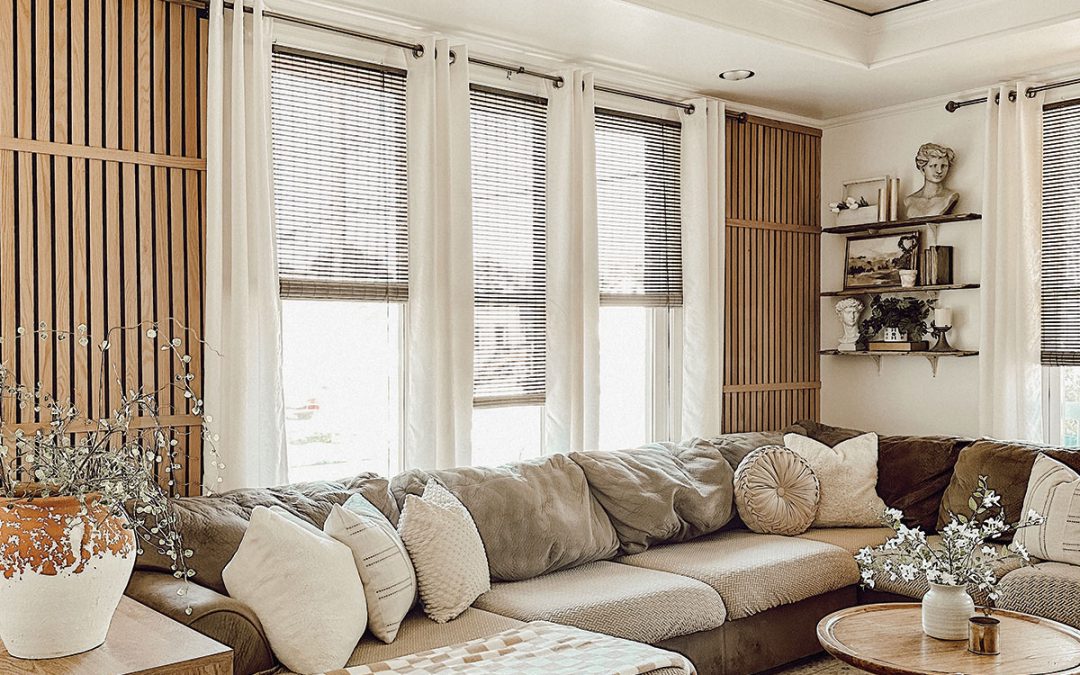
The use of wooden slats in home décor dates back to traditional Japanese design but gained popularity as an aesthetic accent for interior walls and ceilings in mid-century modern designs and in the current Japandi design trend.
Today this sustainable and minimalist design aesthetic endures and has become a favorite DIY project among homeowners looking to add an architectural element to interior walls and other spaces.
Among ways they can be used in interior design:
- Interior Walls: Wood slat walls can be used to connect different interior elements and unify your design scheme. They provide subtle texture, and the natural tones of wood can be complemented by many colors.
- Headboards: Whether sized for the width of the bed or extended to the entire wall, a slat wall adds an eye-catching focal point even in small rooms.
- Ceilings: Wood slats can elegantly frame a space or visually bridge indoor and outdoor areas.
- Barn Doors
Slat wall paneling is made of slim, vertical strips of wood. Solid hardwoods such as oak, maple or cherry are recommended choices.
Hardwood manufacturer Weaber offers prefinished oak slats in its online store. The kit includes 37 solid oak slats measuring 1/4” x 1 1/2” x 36” to cover a 20.625 square foot surface (based on 3/4” spacing).
You can space the slats depending on your personal preference; 1/2″, 3/4″ or 1 1/2″, for example.
DIY Slat Wall Installation
Installing a slat wall is a manageable task that you can undertake with some basic tools and a bit of DIY spirit.
Here are the tools you’ll need:
- Paint roller and roller pan
- Tape measure
- Level
- Nail gun and brad nails or pin nailer
- Caulking gun and liquid adhesive
- Pencil
- Painters tape
- Sanding block
- Wax fill stick
- Spacer
- Miter saw
Step-by-step Instructions
Step 1: Measure the height and width of your wall in inches. Multiply the height times the width. Divide that number by 144; add 5%-10% for cutting and waste.
Step 2: Prepare the surface. The wall must be clean, dry, flat and structurally sound. Remove outlet covers and any nails that may be in the wall. Remove the baseboard if your slats will extend to the floor.
Paint the wall with a color that coordinates with your decor as it will be visible between the slats.
Step 3: Mark the center of your wall. Use a tape measure and a level to find the center.
Step 4: Determine the wall pattern. Will your pattern be vertical? Horizontal? Diagonal? Or a combination? How much spacing do you want between slats?
You may find it is helpful to create a reference line using painters tape. Measure the length your slats will extend from the top of the wall and tape along that line.
Cut, sand, paint and stain slats as needed before you start installation.
Step 5: Apply adhesive to each slat and use brad nails to attach slats to the wall. A nail should be placed at the bottom, middle and top of each slat.
Make sure every board is level and use a spacer to keep gaps between each slat consistent. Repeat this process until the wall is complete.
Cover the nails using a wax fill stick. If you’re using a pin nailer this step can be omitted.
Now you can enjoy the architectural beauty of your brand-new slat wall.
Find a video demonstration of slat wall installation here: https://youtu.be/GofsqAXh00U?si=8qp8byc9jYA42b0O
Photo credit: Our Nohai Home